If you’re publishing content on the internet, there’s a good chance you’ll want to watermark your photos with a logo, name, or other graphic. Watermarking can help brand your content, identify you as the creator or original location, protect your content from being stolen by someone else, etc. Stock image sites use a type of watermarking on their preview images to prevent unauthorized use before a purchase is made. These types of watermarks need to be visible on all types of backgrounds, light and dark while not being too distracting from the actual focus of the image. The team at Sir Lion Labs has created a short walkthrough on how to create a subtle watermark in Photoshop that can be used on both light and dark backgrounds. This works especially well for automating batch actions when doing albums at a time.
Keep in mind, although we designed this solution to be used across a wide range of photo types, it may not always be legible with certain logo shapes, typefaces, or photos with really busy backgrounds but continue reading and we’ll show you how to make some adjustments. With that said, we hope you can use this technique on your photos to create a subtle watermark that will help brand your content without being distracting.
Note: This technique utilizes the shape of your logo to output a black and white watermark. Logos that rely on colors may not work correctly (see step 2 below.)
Why use a watermark? Is it necessary?
As a content creator, you might think that watermarking is 100% necessary but some purists suggest watermarking is unnecessary, tacky, and distracts from the actual content being shared. If someone really wants to “steal” your content, they will find a way by cropping out your logo or importing it into photoshop to edit it out. Social media platforms tend to help make it clear where the content came from and most users who share content on Instagram keep true to etiquette and credit the original creator.
Step 1: Open a document
Open a photo, or graphic background that you want to watermark in Photoshop. We’re using Adobe CC but this technique should be the same on most other versions. Be sure to size your document to the final size before you start editing your watermark as some of the parameters may look different at different document sizes.
Step 2: Import your logo
Import your logo or type text on a new layer. Make sure the graphic has a transparent background or it won’t work. You can also use this technique on just about anything such as Type tool or even the paint brush. The important thing is that you have something on a new layer with a transparent background.
Step 3: Set Fill to 0%
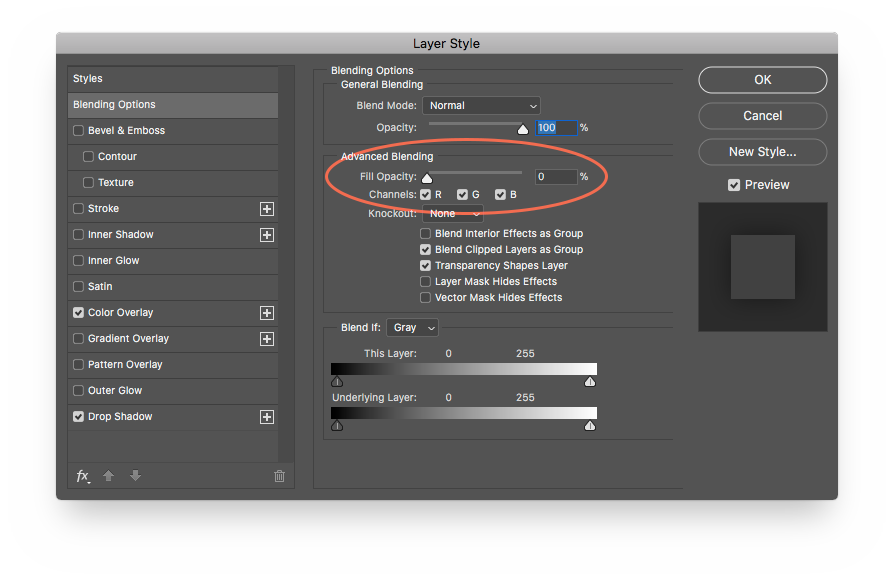
Double click on the layer (away from the layer name) to bring up the Layer Styles menu. Alternatively, you can right click and choose Blending Options. Under General Blending change Fill to 0%. This will remove your colors and make your logo transparent, this is not the same as Opacity as it allows your layer styles to still be 100% opaque which we will adjust later.
Step 4: Set Color Overlay
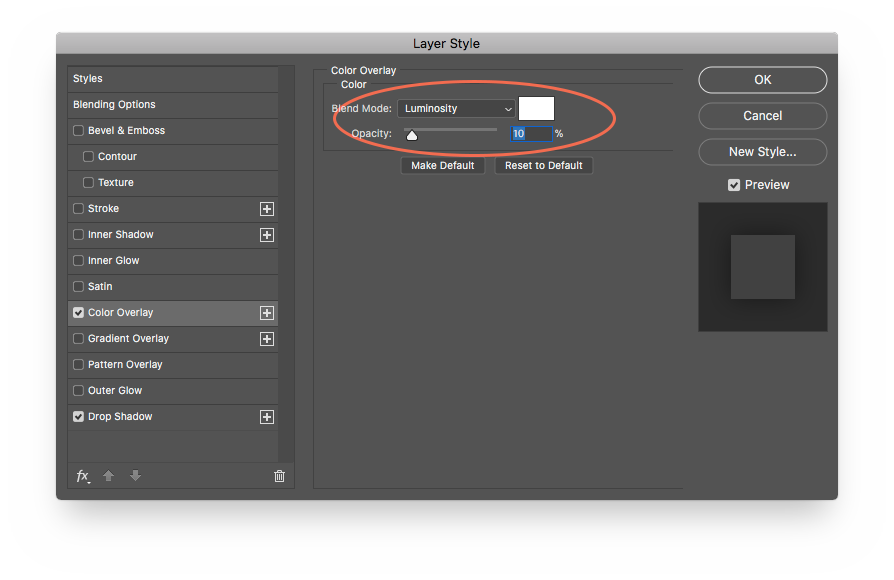
Change the Blend Mode to Luminosity, the Color to White, and the Opacity to 18%. This option fills your logo with white and lowers the transparency for a subtle look on dark surfaces but you can increase the opacity to your liking.
Step 5: Set Drop Shadow
Set the Blend Mode to Luminosity, Opacity to 40%, and both Distance and Spread to 0%. Lastly, the Size parameter setting is up to you and depends on your document size and what you think looks better with your logo. Using a higher number makes the shadow appear almost invisible but if you prefer a harsher transition, use a lower number.
The size of your document and the shape of your logo might take some fine tuning to get looking just the way you want. If you want to play around with the settings, find and image with a contrasting background so you can get an idea of how it will look on both light and dark backgrounds. Increase the sliders to 100% to make it less subtle. Use the Opacity setting for the layer for extra control. Note: You can also switch it up by using inverse colors for two layer styles: set Drop Shadow to white and the Color Overlay to black.
See it in Actions
 If you plan on using this technique for watermarking and resizing a lot of photos at once, you’ll need to create the Action that will automate the process. When creating an Action, it’s best use a copy of a photo just in case the action saves and overwrites your original by accident. Below are the most basic instructions for setting up an action but feel free to add in any other steps you’d like to automate.
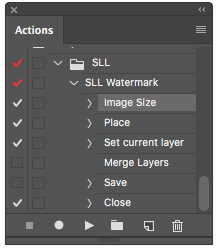
Open a photo and bring up the Actions toolbar by clicking Window > Actions. Click the button on the top right of the window to create a New Action. At the bottom of the window is a circle, click it to Begin Recording. Resize your image to it’s new size with Image > Image Size. Then, import your watermark by clicking File > Place and set the size and location (hit enter to establish the new size). Next, apply the Layer Styles by following the steps written above. Once placed, merge the watermark down by clicking Layer > Merge Down (If you have more than one layer you’ll need to flatten). Save your file by using the Save As option and set your preferences for quality / file size; it doesn’t matter where you save. The last step is to Close the document then Stop Recording.
Test the action by reverting your duplicate photo to it’s original format. Click the first step of the action in the Actions window, then click the Play button to watch your hard work pay off. If everything looks good, it’s time to start the automation! If not, you can make changes to your action without having to re-record the whole thing. To add a new step in the middle of your Action, click the the position in the list to start and stop recording.
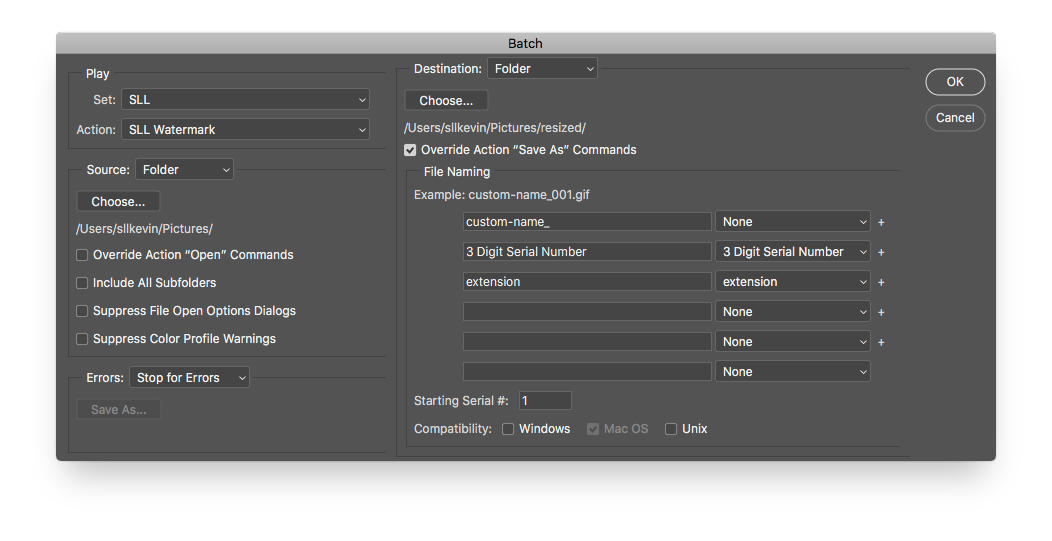
Run the Action across a folder of photos by going to File > Automate > Batch. Choose your action, select the source folder, then choose where you want the resized photos to export. The Override Action “Save As” commands should be marked as checked. Note: Be sure to duplicate a folder of photos before testing this just in case your Save As step accidentally overwrites your original photos! Use the next few options to rename the files to something appropriate, it’s a good idea to have relevant file names for SEO purposes. Hit OK and watch your computer take care of all that hard work!
If you need a new logo, a file vectorized, or made transparent, or if you need help with a watermark design, contact us at the form below, we’re here to help!


 How we created a fresh new logo design for Cargo Express Freight